This guide outlines best practices for effectively enabling and using Marketing connector Sync mechanism. In this guide, you will learn
- Initial steps to start using marketing connector and start a sync process
- Advance options to run sync processes in the background, control the sync process, get error notification, etc.
Definition of terms
Provisioning
The process of adding the add-on to a heroku app
Plan
Add-on is available with a number of set of pre-configured features at different costs. Each set is called a plan.
Custom Plan
When you need some sync feature not available in the pre-configured plans, you may request us for supporting the features you need under a ‘Custom Plan’ that will be available to you only.
Connector
When you want to sync a source table to a destination, you will need to create a ‘Connector’ with the required configuration parameters, so that Marketing Connector has all details to action the sync process.
Getting started
The steps listed below will get you to quickly provisioning and setting up and running a sync job. Once you are familiar with the process, you can explore other features of Marketing Connector to implement your actual use case.
| Steps to follow | What the steps do |
|---|---|
| Provision the add-on | Marketing connector is an add-on, so it needs to be added to a heroku app as a resource before it can be used. |
| Bring up the add-on | Marketing connector user interface can be brought up from the Heroku dashboard only. |
| Set up default options | Even though you can enter the various parameters when you create a connector, setting up some of the default options will help you create connectors faster. |
| Create a sync connector | Each sync process is initiated through a connector with a sync source and destination. |
| Start Manual Sync process | Start the sync process after creating the connector |
| Check the log for sync status | Sync status tells you final status of the sync process with sync result, and any errors it might have encountered |
| Review synced records | Verify records that have been synced |
Provisioning the add-on
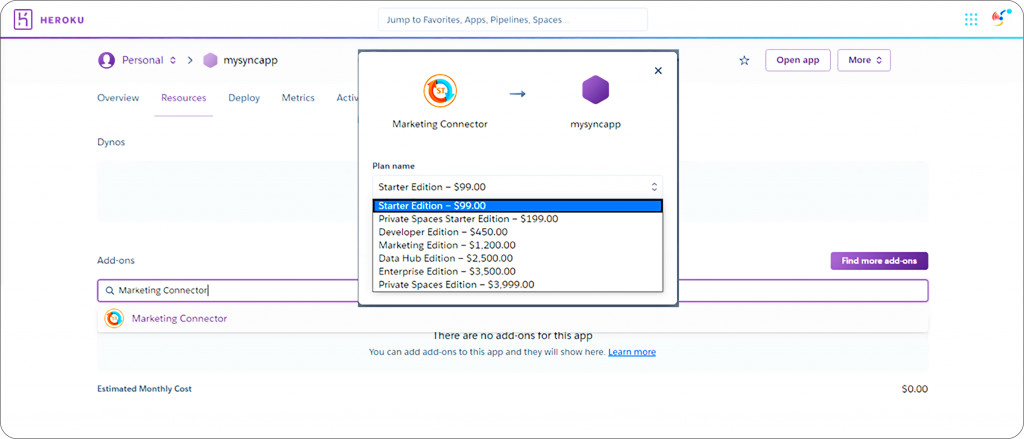
An add-on can be provisioned in one of 2 ways:
- Using Heroku dashboard from the apps resource tab
- Using Heroku CLI
Private space plans and Custom plans can only be provisioned using Heroku CLI
Using Heroku Dashboard
To provision Marketing connector:
- Browse to the Heroku app to which you want to provision the add-on
- Type Marketing connector in search area
- When the available Plans box pops-up, select the plan and the add-on will be instantly provisioned
Using Heroku CLI
Type the following command in Heroku CLI command line
$heroku addons:create mcconnect:ent-edition -a mysyncappThis CLI command will provision Marketing connector (mcconnect), Enterprise edition (ent-edition) to the mysyncapp
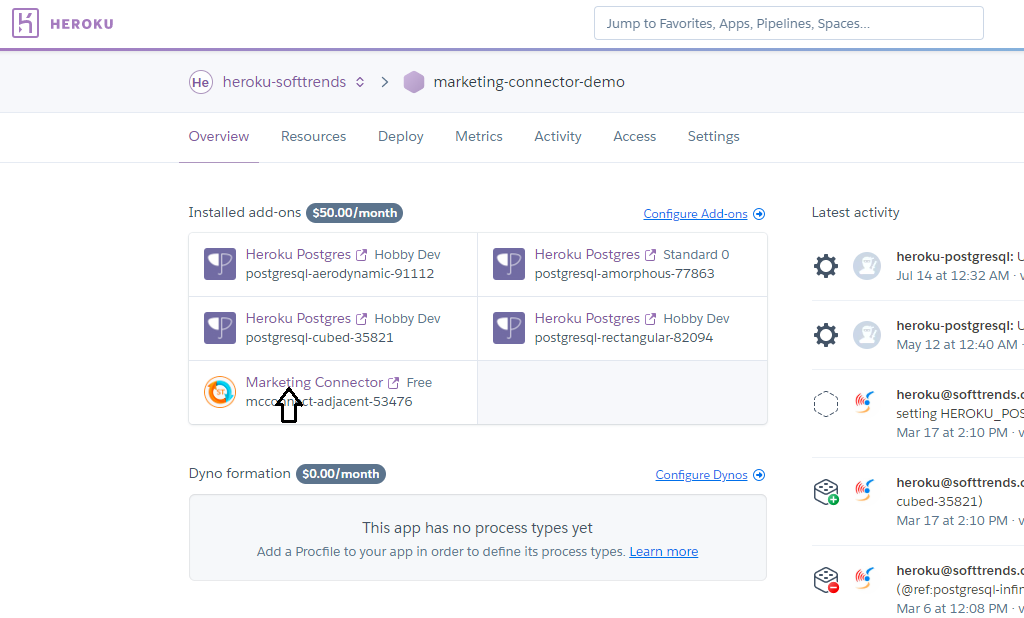
Bringing up the add-on
To bring up Marketing Connector, go to the dashboard of the Heroku app to which the add-on is provisioned and double click on Marketing Connector as shown in the screen below.
Setting up default options
Each sync connector you create will require some parameters that may not change from connector to connector, e.g., Postgres connection string, Marketing cloud credential, etc. This feature allows you to set them up in a global settings which are copied to each connector config for you when you create a connector. The parameters that can be set are as shown below:

Database Config
This will allow you to set the connection strings for the various databases where your data tables reside.

You can set up Database config for a Postgres database on Heroku, Azure or AWS. You will find these parameters in the respective Database dashboards. If you are using Heroku Postgres, and using a Postgres database provisioned to the same app that Marketing Connector is also provisioned to, then you will have the option ‘Get DB URL from App’ which will automatically pick up the URL for the Heroku Postgres.
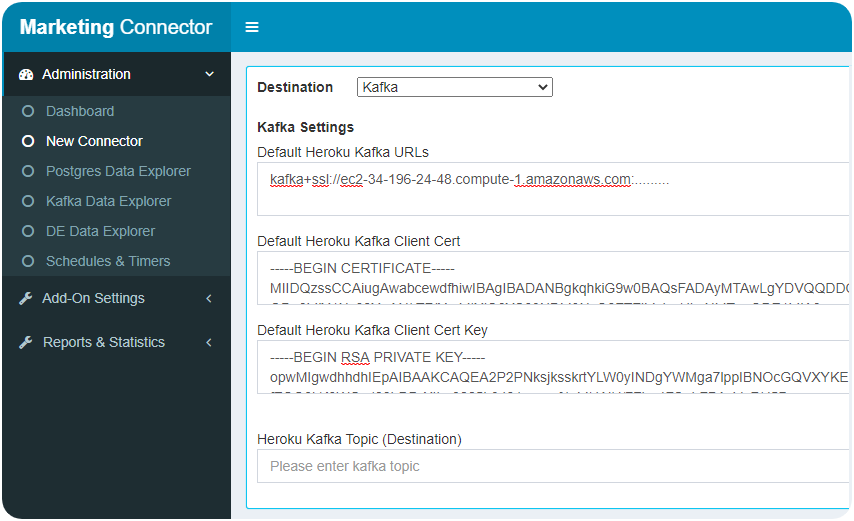
Kafka config
Here you can specify the Heroku Kafka settings,

Kafka settings
Marketing Config
Here you specify the parameters to be used to connect to Salesforce Marketing Cloud.

You will need to get the parameters set in here from your Marketing cloud dashboard. Marketing cloud supports both Legacy OAuth1 and the current OAuth2 marketing cloud end points. If you have acquired Marketing cloud recently, Oauth1 end point may not be supported by Marketing Cloud.
Additional Config
This config screen allows you to setup parameters such as Email Id where any alerts raised during sync can be sent to you.

Creating a Sync connector
You will need to create a Sync connector is marketing connector for each sync process you need. For example, if you want to sync a Postgres table to a Marketing Cloud data extension, you will need to create a Postgres to Marketing cloud connector. Similarly, if you want to sync a Marketing cloud Data extension to a Postgres table, you will need to create a Marketing Cloud to Postgres connector.
Note: A sync connector will only do one-way sync from source to destination, where either source or destination can be a Postgres table, or marketing cloud (bi-directional). To achieve two-way sync between Postgres and Marketing cloud see how to do bi-directional sync.
Following section tells you in general what these parameters mean and what you enter. If you want specific details on each type of sync, you can get them by clicking on the link for specific type of sync:
- To get connector configuration for Postgres to Marketing Cloud sync
- To get connector configuration for Marketing Cloud to Postgres sync
- To get connector configuration for Postgres to Heroku Kafka sync


Connector Name
Name your connector for you to be able to identify what sync it will perform.
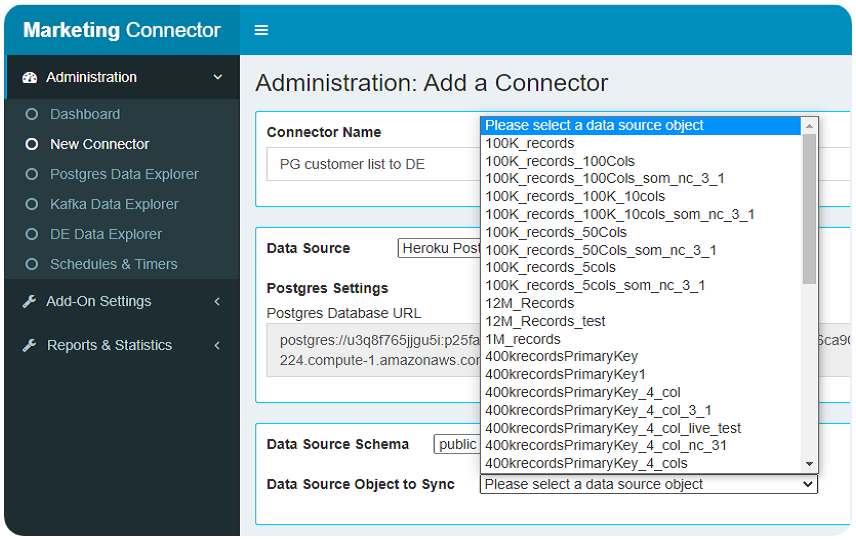
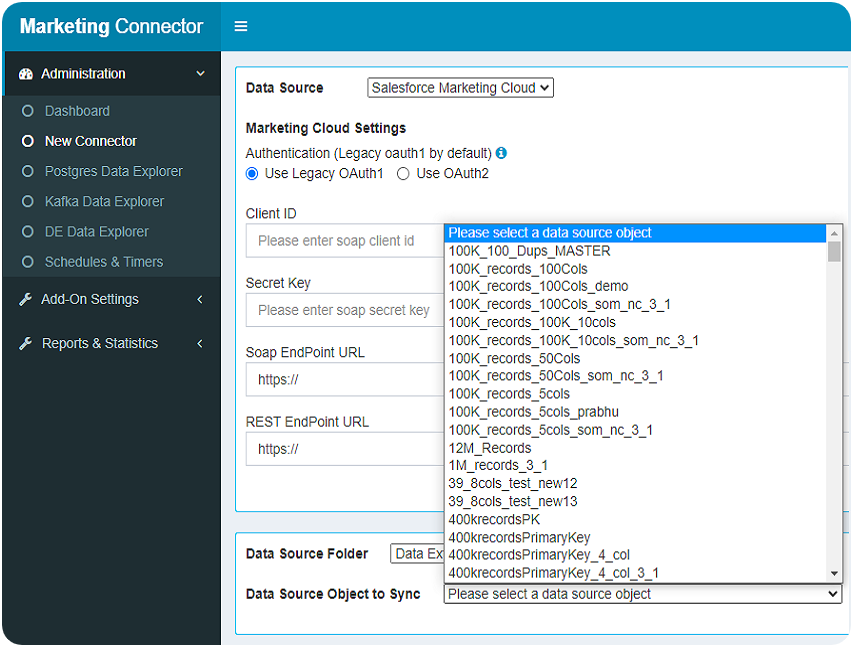
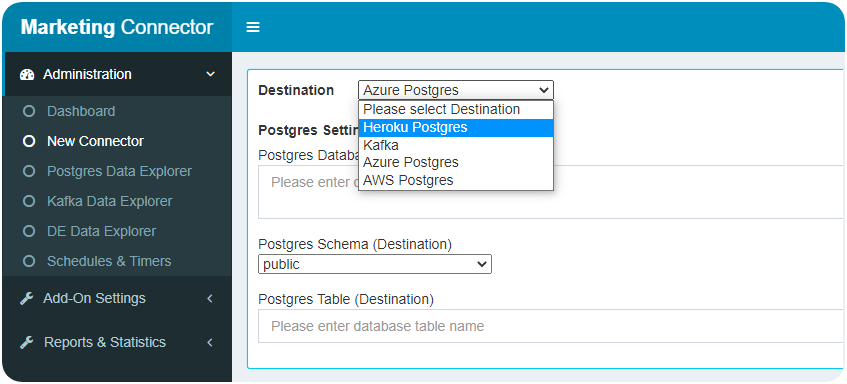
Data source
Data source will give you the option to select either a Postgres database or Salesforce Marketing cloud
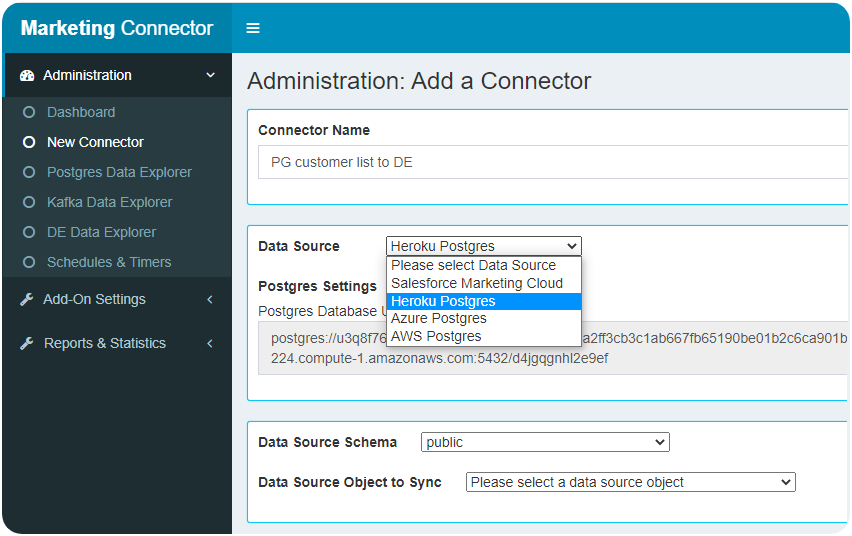
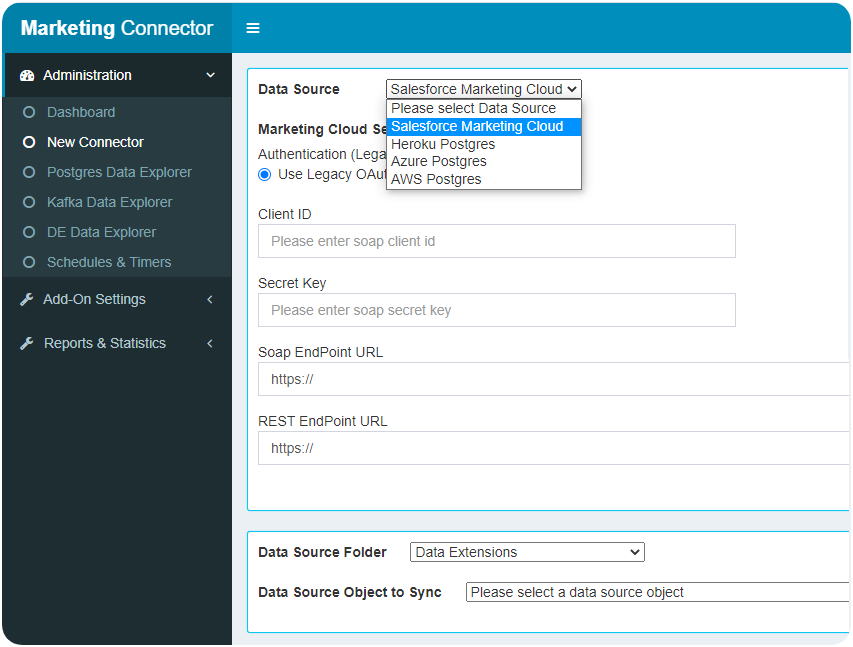
Data source object to Sync:
If data source is Postgres, you have to select the Postgres schema and table, and if the data source is Salesforce Marketing cloud, you have to select the Data Extension folder and the Data extension in the folder.
Destination:
If the Data source is Marketing cloud then the destination can be Postgres or Kafka
If the Data source is Postgres then the destination can only be Marketing cloud

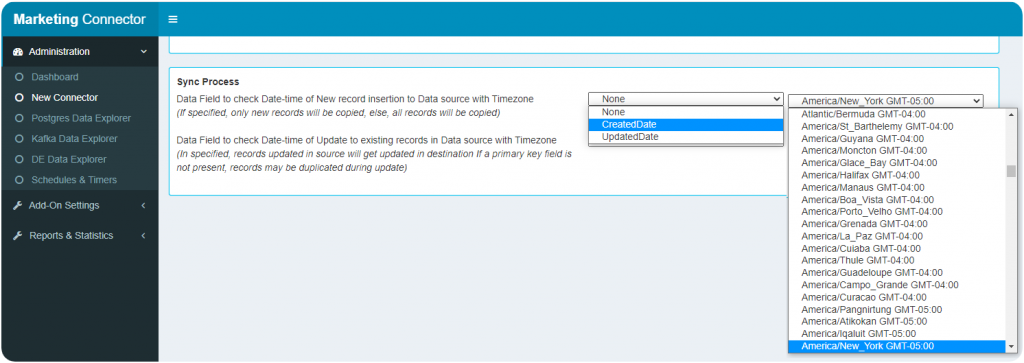
Sync process
These parameters allow you to configure parameters for the connector to do incremental / delta sync. See Incremental sync for what these parameters mean and how they can be set.
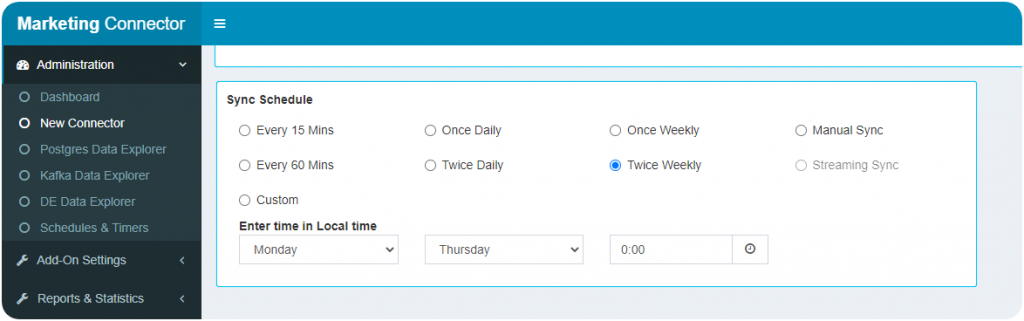
Sync schedule
You can set the connector to sync at different pre-set intervals or on a custom interval. See scheduled sync on how to setup the sync schedule.
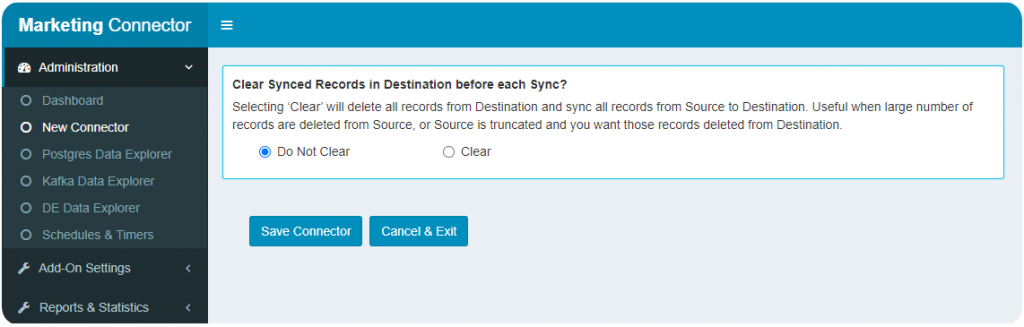
Clear synced records
This parameter allows you to define whether you want continuous incremental sync from source to destination, or everything the sync should clear the destination records before syncing new records from source. Check truncated sync.
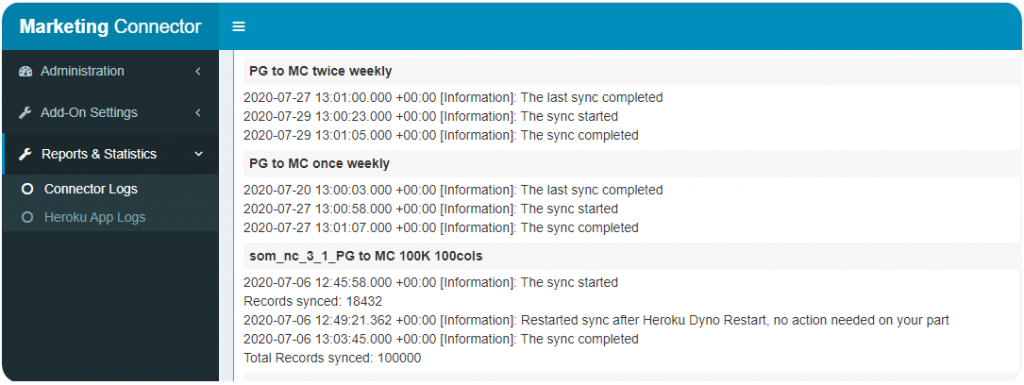
Checking the log for sync status
During the sync process and after end of sync, Marketing connector updates the sync status showing the number of records synced, recoverable and unrecoverable errors. Marketing connector automatically recovers from recoverable errors, but some unrecoverable errors may require user intervention.
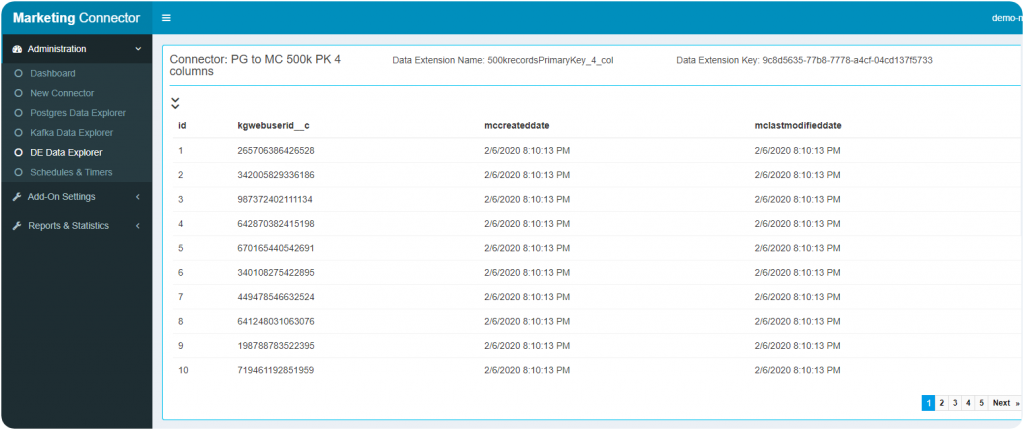
Reviewing synced records
Menu options are available to view synced records for Postgres, Marketing cloud data extension, and Kafka.